

Isle of Demons is a Mission in Nioh. After William's 2 year long voyage from England to the Far East searching for Edward Kelley, he finds himself in a village filled with monsters and death.
Isle of Demons Description
“For many years I was a pirate, until England hired me to collect the miraculous stones called "Amrita". When I learned the Amrita were responsible for the victory over Spain, the authorities imprisoned me, and a man named Edward Kelley stole Saoirse away from me.
Guided by a compass Saoirse left me, I secreted myself aboard a merchant ship, the Liefde. After a long voyage, I arrived at Zipangu, the land of gold. Kelley is here somewhere... And I'm going to find him.” - William
Isle of Demons Loading Screen
Kuroshima is a tiny island off the coast of Usuki in Kyushu's Bungo province. There is little in the way of usable land, with coastline rapidly giving way to cliffs and mountains. Clinging to its edge is the smallest of fishing villages, its residents eking out subsistence farming on plots carved out from the hills. Their frugal lives stand in stark contrast to the village elder, whose opulent mansion perches atop the island's tallest peak, strangely oversized for the small island which it overlooks.
Isle of Demons Completion
“So much for that foreign merchant I've been tracking. I was hoping to capture him and use him as a bargaining chip, but he's dead now... One reaps what they sowed.” - Hattori Hanzo
Isle of Demons Requirements
Investigate the mysteries of the deserted fishing village.

General Information
- Previous: The Man with the Guardian Spirit
- Next: Deep in the Shadows
- Region: Kyushu
- Recommended Levels: 7
- Bosses: Onryoki
- Rewards: Himorogi Fragment x1, Tanegashima Matchlock, Roaring-Gun Ammunition x3
- Gold: 2800
- Amrita: 1200
- Kodama: 9
- Shrines: 3
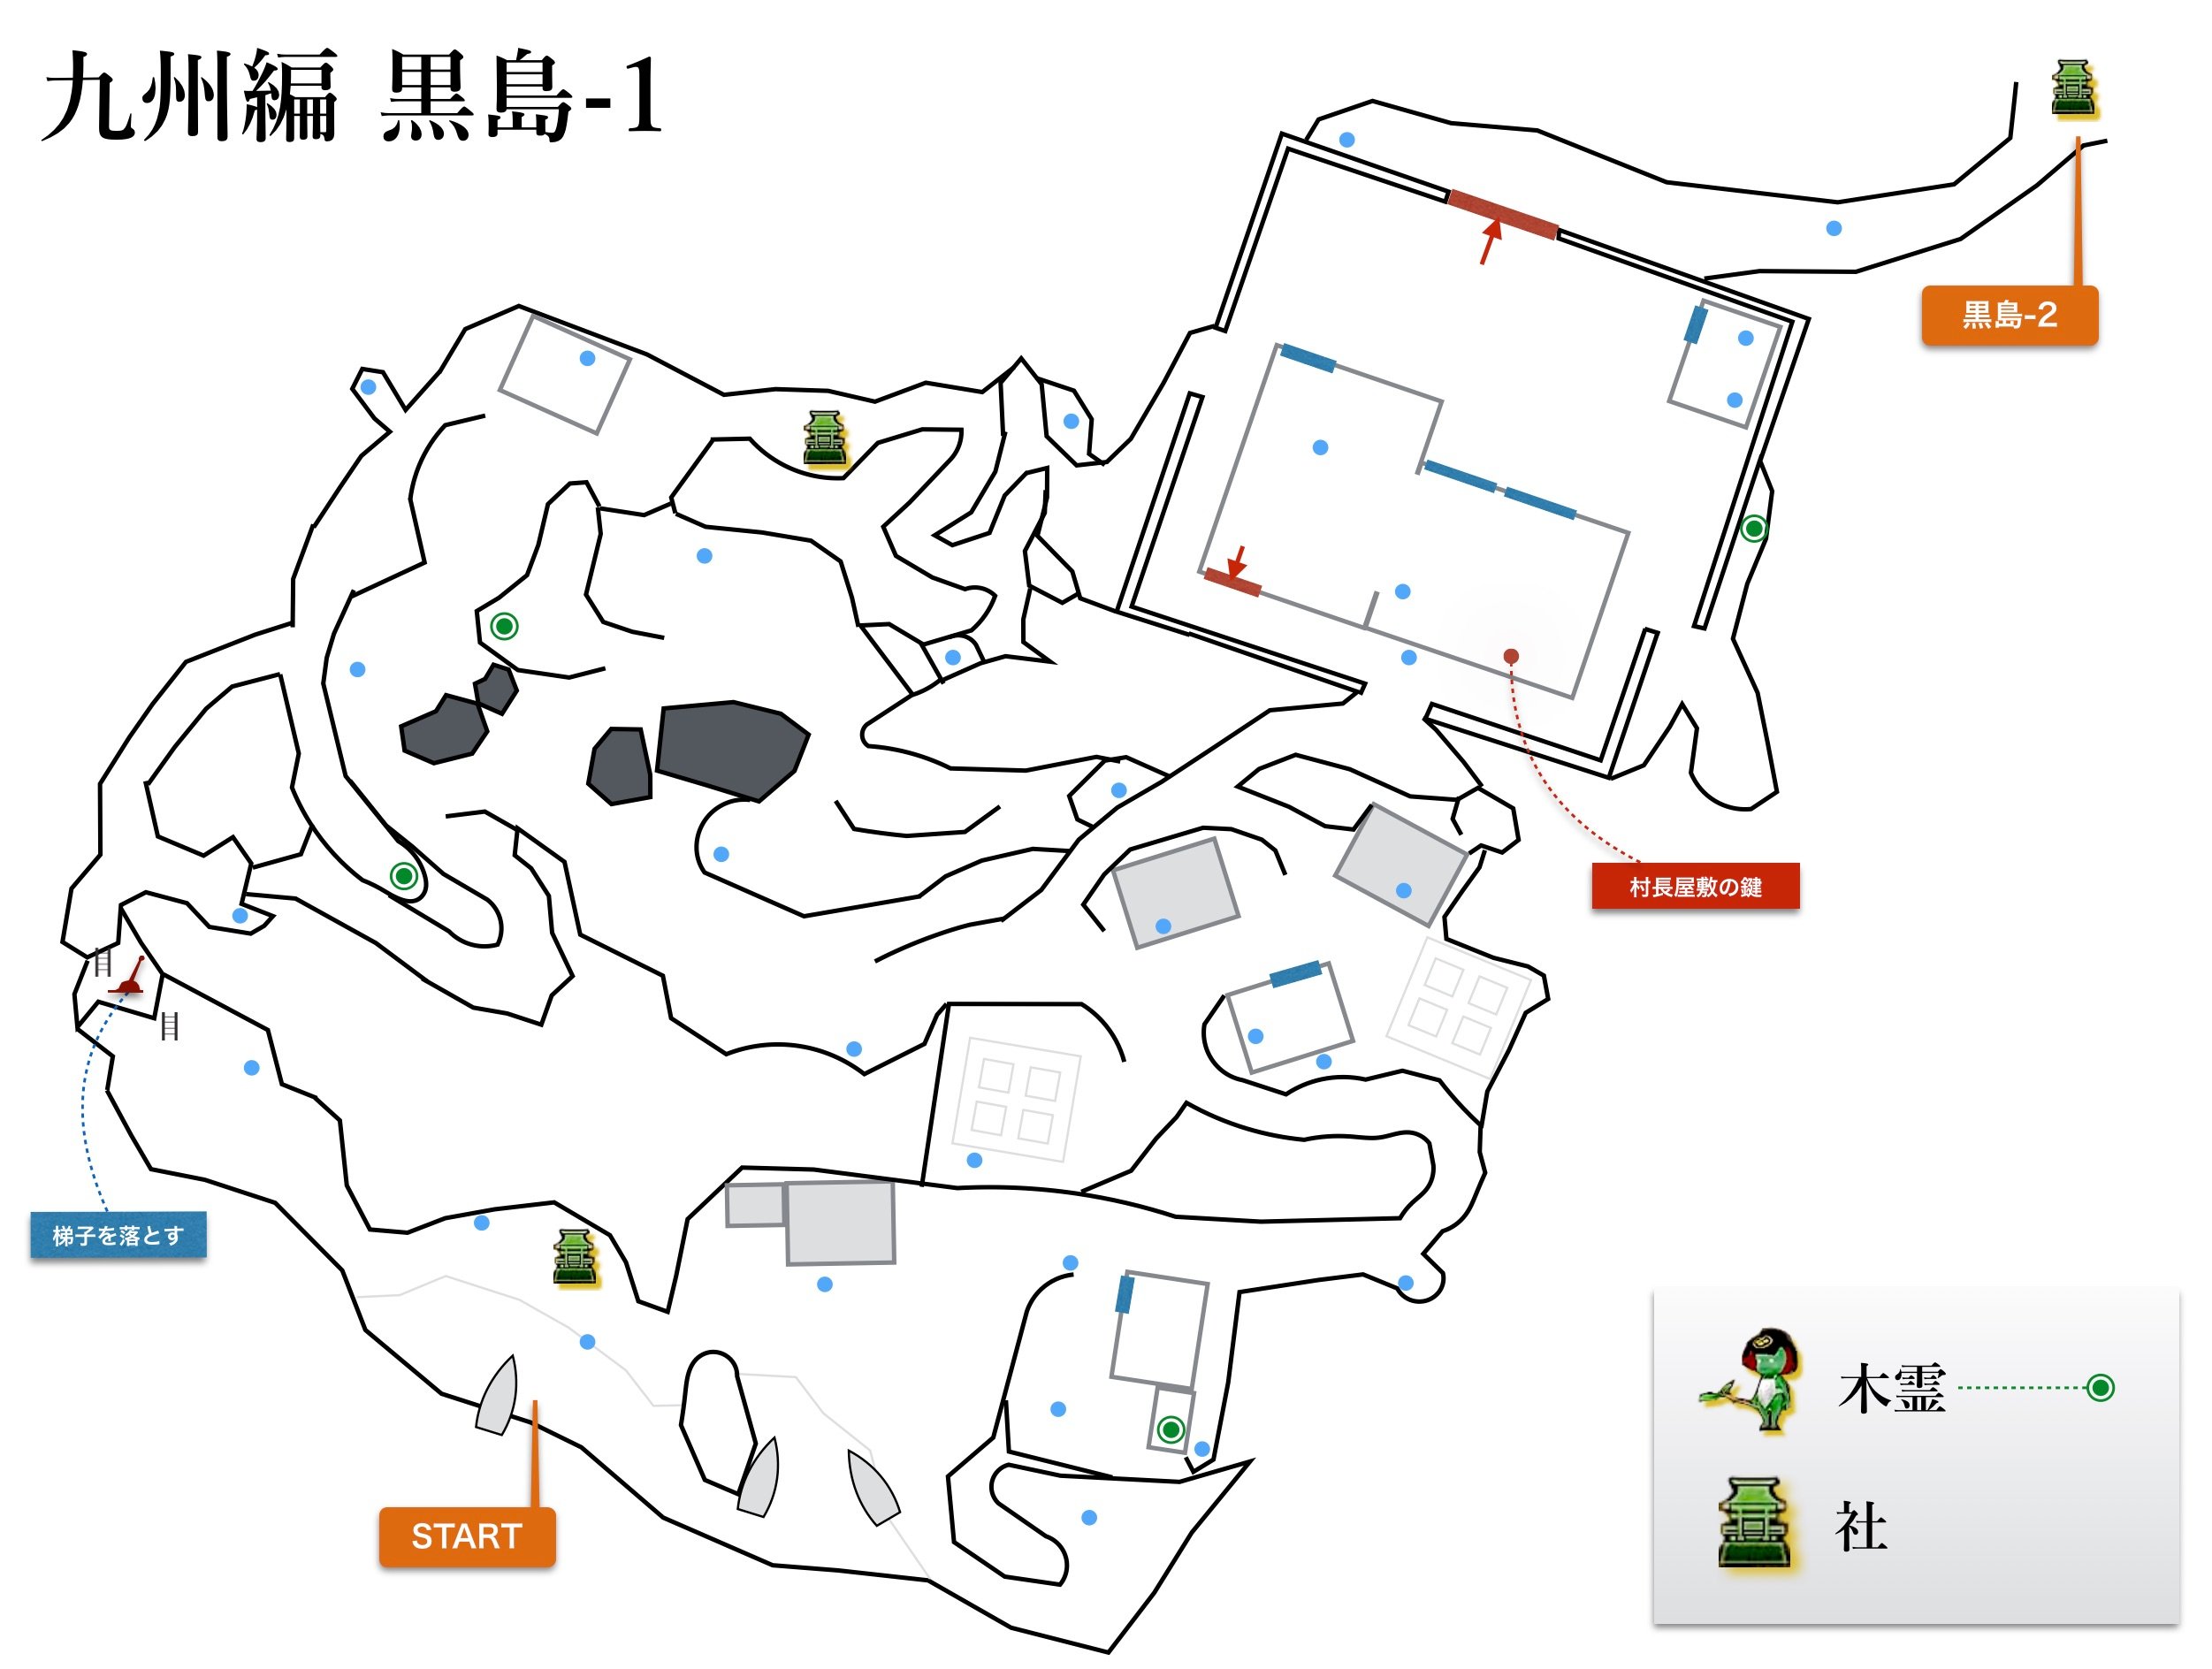
Isle of Demons Map


NPCs in the area
- Hattori Hanzo (After boss)
Bosses
Items
Consumables
- Stone
- 00x ??
- 00x ??
Weapons
- Longbow
- Tanegashima Matchlock
- Bizen-den Tachi
- Soshu-den Dual Uchigatana
- Spear
- Black Steel Axe
- Bandit Axe
- Wooden Hammer
- Pickaxe
- Spy's Kusarigama
- Bizenden Odachi
- Rosewood Tonfa
Armor
Smithing Materials
- Regular Quality
- Exceptional Quality
- Rare Quality
- Spirit Iron Fragments
- Demon's Horn (From Yoki)
Keys & Other
Enemies
Isle of Demons Walkthrough
A full walkthrough including all the items, enemies and bosses goes here. You can add links, images. and other details. Click here to go to the Speedrun Walkthrough.
The mission begins with you washing up on shore in Usuki. In the immediate area you will find some corpses, the corpse close to your boat has the first weapon you chose while on your voyage and another with Amrita and a Small Spirit Stone x1 and a Shrine nearby. Heading left will be a corpse with a Stone on it. Heading to the right from the Shrine between the rocks towards the hut to find another corpse with a tutorial message. Beyond an Warrior will appear. Defeat him and loot the corpse next to him for Armor. Heading right on the shoreline there'll be a Revenant named Isuke the Brick and a Warrior with a corpse with some loot. Continuing up the stairs and finding a corpse to the right with Stone x3. Above are two Warriors. Defeat them loot the corpse and enter the hut to find a chest. In the corner of the open hut here you can destory a wooden wagon to reveal a Kodama. Press O to guide it back to the shrine.
Continue through the narrow path. To the right is an alley by a building with boxes you can break to find a corpse you can loot for Footsoldier Armor: Jingasa. Return down the alley and head right to continue on the path. On your right you will find a corpse with Amrita and a tutorial message.
To your left will be a spear wielding enemy who will charge you. Defeat him and head up the path. If you go to the left by the scarecrow patch you will find an enemy and a corpse you can loot for the second weapon you chose while on your voyage with a tutorial message. Up the stairs you can loot a corpse along the first home's wall for a Signpost Talisman x1.
Go back up and to the next small village area. Ahead and to the right is a katana wielding enemy hanging out in the doorway of the hut. He will attack when you approach, defeat him and enter the house. You can open a small chest here for some loot. Exit the house and head right to find 2 enemies with weapons. Taking on multiple mobs is not the best idea, so tossing a Stone at one can lure them one at a time. Defeat them and to their right along the short cliff you will find a corpse by the corner of the hut with a Spirit Stone x1.
If you backtrack you can head up the sloping path along the mountain to find a tombstone with a tutorial message. Going up the path you will find an enemy with an axe. Near you can loot a corpse here for a Small Spirit Stone x1.
Continue up the path to a small clearing and find an enemy in a nook to the right. If you proceed down from here you will come to another clearing with a corpse and a tomb you can loot. Follow this clearing down to find another enemy. A corpse here will have Stone x1. You can drop down to a corpse here with Fire Amulet x2. You can drop down from here to get back to the path and head back up. Straight ahead you will find a corpse with a tutorial message and to the right 2 more corpses and an enemy with a spear. Be careful as another enemy on the ledge above will be firing flaming arrows at you.
If you head in the opposite direction you will come down a narrow path that ends at a ledge. At the ledge, drop down to find a corpse in the corner to loot Spirit Stone x1. Ahead you will find a corpse with a Sacred Water x2. Continue on to the corner path to find a ladder you can kick down to a ledge with a corpse that has Kayaku-dama x2. Here you can kick another ladder down to the shore with a corpse that has a Stone x1. Head along the shore to complete your shortcut back to the game's first shrine.
Head back up the ladders and take the path forward. Defeat the enemies ahead and loot the corpse in the hut for a Longbow, Hamaya Arrow x1 and Arrow x5. If you head up to the right through the narrow pass you will find a Shrine.
Continue up the path and follow the curve to the right to find an enemy. Below you will see a patrolling enemy on the ground floor of the ravine. Drop down to take it out and progress through the broken wall to enter the building's compound. To the right is an enemy standing. You can sniper him with your bow. There is another enemy patrolling the main front courtyard area. Behind the structure are more enemies in wait. You can snipe them all at range to deal with them 1v1. Headshots do critical damage.
Inside the house you will see a smokey aura which you can approach to reveal a yokai. It's your first challenging foe. Stay away from its slashes and dodge to its rear. Using the Living Weapon of your Guardian Spirit can help you get in some valuable hits. Inside the hut, you can find the Key to Residence on a corpse.
Exit the house and use the key to open the door and exit the compound.
You will be progressing through the village below, making your way to the rooftops and to the shore. Before you head down turn left to find a Horoku-dama on a corpse and then head down the path to find a corpse with Salt x2. Continue down the path to find a Shrine. If you look down the ridge you will see a Kodama on a ledge that you can drop down to. Head across the roof towards the shrine to find a corpse with Longbow and Arrow x3.
Once back at the shrine head down towards the village being wary of the yokai to the right of the shadowy realm. You can get around him by smashing the crates in the alley behind him. If you get too close to the realm you'll reveal a dual wielding oni. Let him lunge and dodge and get your attacks in and then back off. Don't spam your attacks. Once he's defeated turn the corner and watch for the archer from above. Mind running in because an enemy is waiting to your left near a well. Take him out but before going up the ladder head around to the side of the house to take out an enemy and loot a corpse for a Small Spirit Stone x1. Behind the house with the ladder you can also find a Whetstone x1.
Take the ladder up to the roof and head towards the next section being wary of loose roof tiles. If you step on them you will fall into the house and be ambushed. It's best to tackle this mission from the roof. Past the loose tiles you will see 2 enemies to the right, you can snipe. Loot the corpse on the roof for Antitdote x2 and before climbing down look under the platform with the ladder to find a Kodama.
Take the ladder down into the home and an enemy pretending to be a corpse will come to. Defeat it and loot the corpse for a memory. Leave the house for the one opposite to find an enemy in front of a large chest. Defeat him and loot the chest for Yamato-den Tachi, Kayaku-dama, Spirit Stone x1 and Hamaya Arrow x3. There is another yokai realm swirl in the middle of the path. You can also head right to a side alley. The yokai revealed is a katana yokai. On the other side you will find a hut with a door that will lead you to a small canyon. Take out the 2 enemies here (one is hiding in the grass). Loot the corpse here for a Fire Omamori Charm.
Head to the tower and take out the enemy and check the structure by the wall to smash a row of crates and reveal a corpse with Spirit Stone x1 and Kayaku-dama x1. Climb the ladder to the watchtower and drop to the roof elow. Cross over the bridge and beyond the fire you can find a corpse with Tanegashima Matchlock, Roaring-Gun Ammunition and Rifle Ammunition x3. Head back over the bridge above the house where you looted the chest, being careful of the loose part of the roof. Cross the next bridge and you can lower a ladder that serves as a shortcut to the start of this section.
The bridge will lead you directly into a shadow realm yokai. Be careful engaging it on the rooftop, you may be able to get it to fall and then land a jump attack. Get back to where you were on the roof and on the next roof you can cross a bridge to loot a corpse for Horoku-dama. Head back to the ladder and take it down (or drop down from any of the rooftops here).
Take out the patrolling enemy and go towards the blocked path of fire. Look right to find a corpse around the side of the structure with Yokai Water Pot x2 and Spirit Stone x1. Turn around and find the fire roadblack and find in a house on the right 2 enemies and a large chest with Earth Omamori Charm, Rogue Armor Kote, Spirit Stone x1 and Bizen-den Uchigatana. Head towards the other fire blockade by the watchtower and find the open door on the right to go through the house with an enemy and out the other side, thus circumventing the roadblock. Along the way you can loot a corpse for Antidote x1 and Travel Amulet x1. When you leave the house find a Black Steel Axe to your left. Ahead there is a patrolling enemy. To your left is an alley with a corpse you can loot for Spirit Stone x1. Keep going down the long alley to a watchtower, and behind the opposite house you can defeat an enemy and loot a corpse for a Moment Talisman.
Get back to the main path and lure the guard and take him out without alerting the other enemies ahead. Lure them out aftewards in the same way. Before heading to the beach, look to the side of the fires to find an alley. You will find an enemy here and a ladder to the right watchtower. Loot the body here for a tutorial on drop attacks and kick down the ladder to unlock another shortcut. Drop from this spot to the rooftop and loot a corpse for Summoner's Candle x1. Look behind you to find a small shack by the roof where you will find a Kodama.
Head back to the other watchtower and take the bridge onto the rooftops opposite the building you were just on. Watch out for loose spots again and head to the far roof. Find the ladder on the left and a barrel on the right you can push to put out some of the fire, creating a shortcut to the shrine. Take the ladder down and loot the corpse for a memory.
Head out to the beach and grab the Small Spirit Stone x1 by the gate and find a corpse inside the house on the left for Unusual Armor Mengu and a small chest with Horoku-dama and Ochoko x3. Outside you will find 2 patrolling enemies and 2 more on the docks. To your left you will find a corpse with Small Spirit Stone x3 and a corpse by a busted boat with Small Spirit Stone x1. Head out to the shore and look left along the rocks to find a Kodama hiding on a small rock. You'll have to get partially in the water to reach it, just don't go too far.
Left of the main gate you wil find a red arch leading to the beach. Go down and come to a cave of corpses you can loot for Spirit Stone x1, Harakiri Sword and Squire's Jumonji Spear.
Back at the main gate to the beach, head right and stay along the wall to get behind the shack. Inspect the grave for Amrita and go behind the next house to find a spear wielding foe. Kill him and go around the front of the house to find Salt x2. Head up the path around the back of the house which leads you to the double door you can unlock for a shortcut to the Shrine! If you keep going right you can find the final Kodama.
Return to the ledge overlooking the beach and drop down to the roof of the home you were just in which was locked and reveal the shadow realm. It's a tough fight in tight quarters especially because of the realm's AoE so really conserve your Ki and use Ki Pulse liberally. Dodge his attacks and attack when he hits the wall. Loot the corpse and chest here for Platemail Kote, Platemail Suneate and Platemail Kabuto. Exit out the door and head towards the boat.
Approach the boat to trigger the mission's Boss fight, Onryoki.
Boss Fight: Onryoki
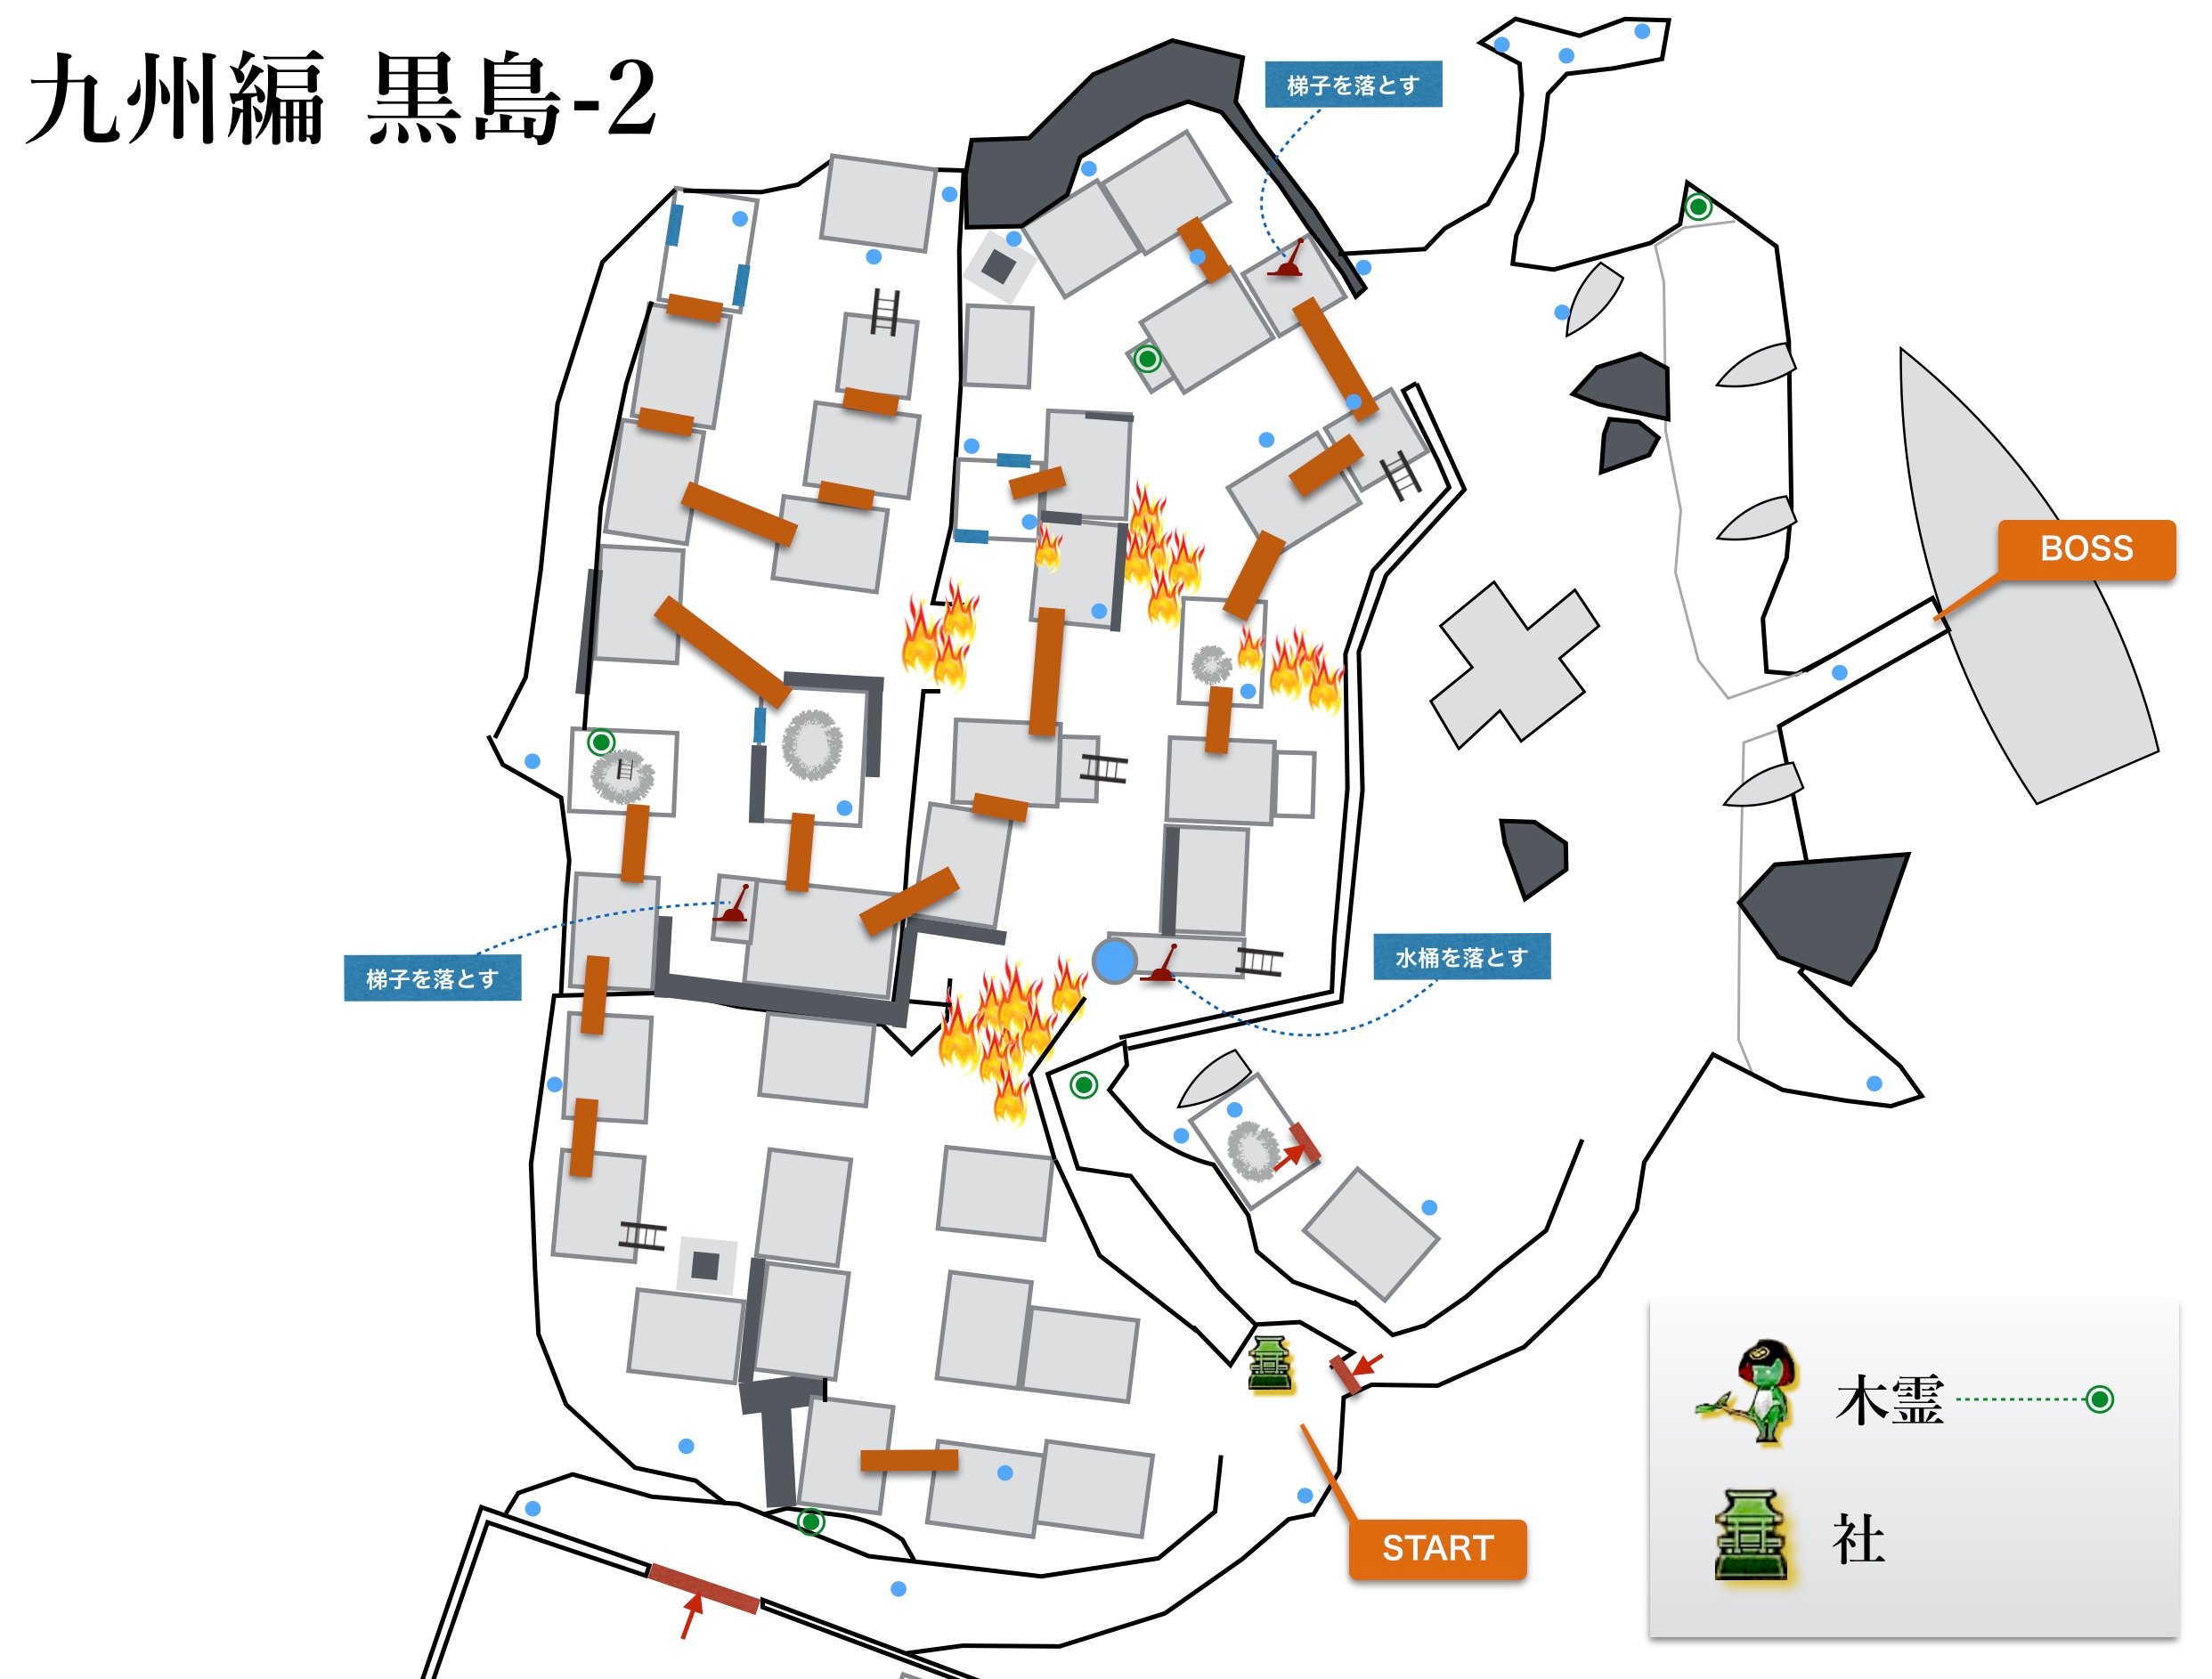
Isle of Demons Map
 Anonymous
The maps of the Isle of Demons level were SOOO helpful - pity they don't have them available for all levels :( Nioh is a very disorientating game.....
- Anonymous
Just to put this out there. In the walkthrough when it first says that you find the Black Steel Axe, and then again when it says Spy: Kusagirama (Kusarigama). What you find is a basic version of the first and second weapon you had selected in the prologue book.
- Anonymous
This isn't the next mission after the Tower of London, the next mission is a tutorial mission. A tutorial that cannot be completed!
0
+10
-1